
Using Custom Fonts in a Swift Package
Written by: Martin Johannesson
When we start working on an app with a new partner, we typically receive a copy of their brand guidelines. More often than not, there is a specific font that is associated with the partner’s brand identity that they would like for us to use in the app. There’s of course nothing wrong with the system font, but there are often advantages to keeping a consistent look across all channels and platforms.
You can introduce a custom font in an iOS app in different ways. One of the more common ways is to simply include the TrueType / OpenType font files directly in the main app bundle and then register the file names in the app’s Info.plist .
This is a perfectly reasonable approach, but what if we want to use the same font in multiple apps, or in different targets, such as widgets, or a watch extension? Wouldn’t it be convenient if instead of spreading things out over multiple font files and googling exactly what we’re supposed to put in the .plist for the umpteenth time, we could just keep everything in one place, as a reusable Swift package?
Let’s assume that you answered “yes” to this leading question, or the rest of this text will probably be rather awkward, as its sole purpose is to show you one way of creating such a convenient package.
Perhaps best of all: No .plist file will be harmed in the making of this package.
– We will assume that you are familiar with the basics of creating Swift packages.
– We are using Xcode 13.3.1, so things may be slightly different if you’re reading this in the future.
The Font Files
Let’s say that we want to use the font Antonio in our example app. Mainly because it’s a free font with a permissive license that won’t open us up to litigation, but it also looks kind of nice, I guess. In any case, a lawsuit would be rather counterproductive to our noble quest for convenience.
Here, have a complimentary preview of the Antonio font:

The font has three weights; light, regular, and bold. Fonts typically include more weights, but this is a free font. As the saying goes, don’t look a .gif horse in the mouth.
When we download the font, we receive one TrueType file per font weight. The files are named:
– Antonio-Light.ttf
– Antonio-Regular.ttf
– Antonio-Bold.ttf
We will soon add these files to an asset catalog to keep them organized, but not yet. Consider this an exciting cliffhanger to keep you reading.
Creating the Swift Package
First, we need to set up an empty Swift package, where we will then add our code and font files. We can do this in Xcode by creating a new project and choosing the Multiplatform > Swift Package template.
Name the package AntonioFont and save it. In our newly created package folder, we can remove the subdirectory named Tests . (Or you can keep it if you want, but writing unit tests is outside the scope of this text.)
Replace the contents of Package.swift with the following, because we will only have one target and no dependencies:
// swift-tools-version: 5.6
import PackageDescription
let package = Package(
name: "AntonioFont",
platforms: [.iOS(.v14)],
products: [
.library(name: "AntonioFont", targets: ["AntonioFont"])
],
targets: [
.target(name: "AntonioFont")
])
The reason we are setting iOS 14 as deployment target is that we will use SwiftUI functionality that is not available in earlier versions of iOS.
Add the Asset Catalog
Now it’s time to make good on that cliffhanger from earlier, because the next step is to create an asset catalog where we will put the font files. Oh, the suspense!
Add an asset catalog named e.g. AntonioFont.xcassets under Sources/AntonioFont in the package. Xcode will automatically include the asset catalog in the package bundle when we kick off a build.
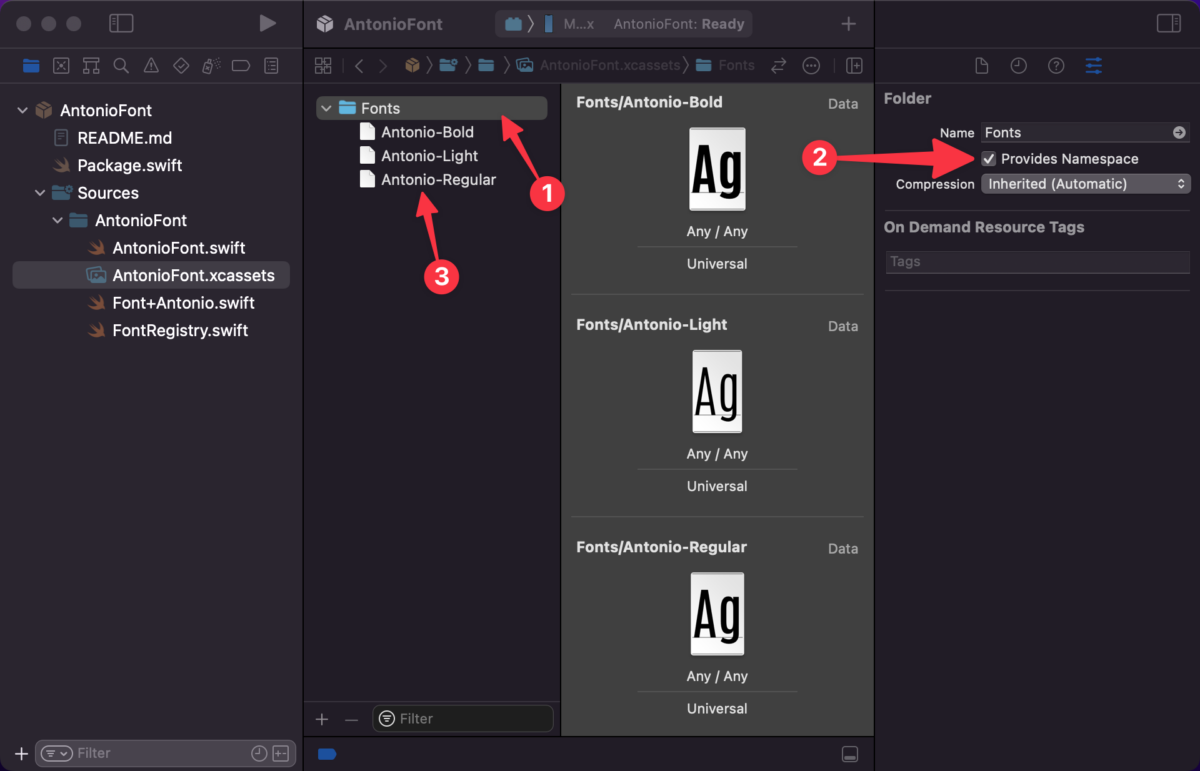
Adding the font files is a three-step process:
1. Select the asset catalog in the Xcode project navigator, and create a top level folder named Fonts .
2. Select the Fonts folder and check the Provides Namespace checkbox. It’s often a good practice to namespace assets this way, to keep them from colliding with assets in other asset catalogs.
3. Now drag the .ttf font files into the Fonts folder.
At this point, your asset catalog should look like in the screenshot below. Except for the arrows, I drew those.
Font Registration
Remember the part from before when we said no .plist would be harmed? That’s because we are going to use CoreText to programmatically register the font files instead. We will basically be doing what iOS is doing for custom fonts that are specified in the .plist .
Add a new Swift file to the package and name it FontRegistration.swift . Paste the following code in the file:
import UIKit
import CoreGraphics
import CoreText
public enum FontError: Swift.Error {
case failedToRegisterFont
}
func registerFont(named name: String) throws {
guard let asset = NSDataAsset(name: "Fonts/\(name)", bundle: Bundle.module),
let provider = CGDataProvider(data: asset.data as NSData),
let font = CGFont(provider),
CTFontManagerRegisterGraphicsFont(font, nil) else {
throw FontError.failedToRegisterFont
}
}
We are making the error public, so that it can bubble all the way up to the app that uses the package. Let’s take a look at the registerFont(named:) function. It takes the name of the font asset as a parameter, e.g. Antonio-Medium .
The first line imports the font file as an NSDataAsset from the Bundle.module bundle, which is the bundle where our package stores its resource files.
We then use the asset object to create a CoreGraphics font instance. Finally, we can register the font instance by feeding it to the CTFontManagerRegisterGraphicsFont function, and ta-da! No need to specify fonts in a .plist .
Using the Font
At this point, we could stop here. The font is ready to be used in SwiftUI, if we explicitly register it first:
AntonioFont.registerFont(named: "Antonio-Regular")
Then we can apply it to a Text view, like so:
Text("Hello, World!")
.font(Font.custom("Antonio-Regular", fixedSize: 17))
Note: Font.custom(…) requires that you pass in the Postscript name for the font. This is usually the same name as the font file, but not always. If you install the font on your Mac, you can use the Font Book app to find the Postscript name.
It sure would be nice to not have to rely on a string based API though, because it’s easy to make typos, so in the next section we will take this one step further.
Representing the Font
When we created the package, Xcode most likely created a file named AntonioFont.swift per default. We will repurpose this file by replacing its placeholder nonsense code with the following code. You know the drill.
import SwiftUI
public struct AntonioFont {
public let name: String
private init(named name: String) {
self.name = name
do {
try registerFont(named: name)
} catch {
let reason = error.localizedDescription
fatalError("Failed to register font: \(reason)")
}
}
public static let light = AntonioFont(named: "Antonio-Light")
public static let regular = AntonioFont(named: "Antonio-Regular")
public static let bold = AntonioFont(named: "Antonio-Bold")
}
The purpose of this struct is twofold:
1. We no longer have to type the font name as a string everywhere we want to use it.
2. It lets us lazily and implicitly register the font on demand the first time it is used.
The registerFont function is not likely to fail, unless the wrong name for the font is used. This could be considered a programming error, so we chose to handle thrown errors with a fatalError(...) . We want to catch this problem early.
SwiftUI Convenience
For our final trick, we will extend SwiftUI’s Font struct for some extra convenience. Add a new file to the package and name it Font+Antonio.swift , as it is customary to name files that contain extensions with a + symbol. Hey, I didn’t make the rules! Then paste the following in the file:
import SwiftUI
extension Font {
public struct Antonio {
/// Returns a fixed-size font of the specified style.
public static func fixed(_ style: AntonioFont, size: CGFloat) -> Font {
return Font.custom(style.name, fixedSize: size)
}
/// Returns a relative-size font of the specified style.
public static func relative(_ style: AntonioFont, size: CGFloat, relativeTo
textStyle: Font.TextStyle) -> Font {
return Font.custom(style.name, size: size, relativeTo: textStyle)
}
}
By adding these static convenience methods, we can leverage Swift’s type inference to not have to type as much. Here’s how we would apply the font to a Text view in SwiftUI, if we wanted a font that scales relative to a SwiftUI text style, which is the recommended way for accessibility reasons:
Text("Hello, World!")
.font(.Antonio.relative(.bold, size: 17, relativeTo: .body))
If we wanted a fixed size font we would instead do this:
Text("Hello, World!")
.font(.Antonio.fixed(.regular, size: 17))
Conclusion
That’s it, we’re done! We can now import this package wherever we want to use the font.
To recap what we did:
– We put all the font files in one single asset catalog.
– We registered the font files programmatically to not have to edit the .plist .
– We extended Font with convenience methods to avoid string-based API.
– We put both the resources and the code in a reusable Swift package.
It’s interesting to note that you don’t have to do all four of these, for this approach to be useful. The last two bullet points are optional.
References
You can read more about these relevant topics on Apple’s developer site:
– Adding a Custom Font to Your App
– Creating a Standalone Swift Package with Xcode
Written by: Martin Johannesson
Martin has been developing iOS apps at Bontouch for over a decade, if you can believe it. He specializes in restarting Xcode and deleting the derived data directory. Sometimes he also writes code.